Best Smoke Detectors For Safer Homes In 2026
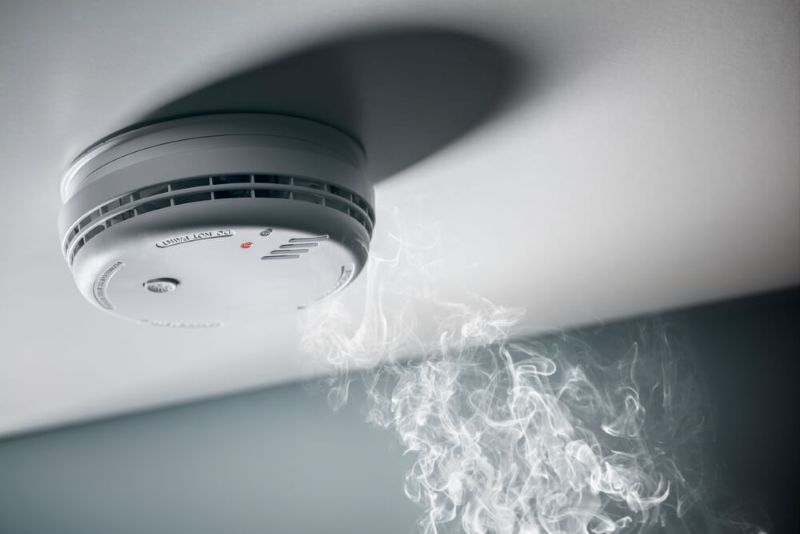
A smoke detector has to catch different kinds of fires. Some fires smolder slowly before flames appear. Others flare up quickly. That is why buyers often see terms like photoelectric, ionization, or dual-sensor alarms.Photoelectric alarms are usually better at detecting smoldering fires. Ionization alarms are often quicker with fast-flaming fires. Dual-sensor alarms try to cover both. Smart alarms add phone alerts, voice warnings, or app controls, but they should not be treated as a replacement for proper placement and working batteries.For homes with gas appliances, fireplaces, or attached garages, a carbon monoxide detector is also important. Smoke and carbon monoxide are different dangers, so a combo unit can be useful, but homeowners should still check what the device actually detects.Best Smoke Detectors For Everyday Home SafetySmoke detectors are not exciting to buy. Nobody walks into a store and says, "Great, this is the fun purchase of the month." Still, they are one of those small devices that matter more than almost anything else in a home. If something goes wrong at 2 a.m., the alarm has one job: wake people up fast.That is why choosing the Best Smoke Detectors is not only about price or brand name. It is about sensor type, placement, battery life, smart alerts, and whether the alarm is easy enough to maintain that people actually keep it working. A silent, dead, expired alarm is basically decoration.The NFPA recommends smoke alarms inside each bedroom, outside each sleeping area, and on every level of the home, including the basement. That placement matters more than most people think. One lonely hallway alarm may not be enough. 1. First Alert Smoke And CO AlarmsFirst Alert is one of the top brands of smoke detectors, and for good reason. The brand offers basic battery alarms, hardwired alarms, combination smoke and CO models, and newer smart options.For many homes, First Alert works because it is easy to find, familiar, and available in many price ranges. It is also a strong choice for buyers who want a no-drama replacement for older alarms.Consumer Reports listed models from First Alert, Kidde, and Siterwell among its tested smoke and carbon monoxide detector picks for 2026, which keeps First Alert firmly in the serious-buyer conversation. 2. Kidde Smoke And Carbon Monoxide AlarmsKidde is another big name in home fire safety. It makes basic smoke alarms, CO alarms, hardwired units, and smart alarms that work with certain smart home systems.A Kidde alarm can be a practical choice for homeowners who want dependable protection without overcomplicating things. Some models include voice alerts, sealed batteries, or app support, depending on the version.Why Kidde Works For Many HomesKidde is useful for families who want simple installation and a brand they can easily replace or expand later. That matters when a home needs several units, not just one.3. X-Sense DetectorsX-Sense has become popular with buyers who want modern-looking alarms, interconnected systems, and combo protection. Many models are designed with long-life batteries or wireless interconnection, which can be helpful in homes where hardwiring is not practical.For renters or older homes, wireless interconnection can be especially useful. If one alarm sounds, other linked alarms may sound too, depending on the system. That can give people more time to react.This makes X-Sense a sensible option for anyone comparing the Best Smoke Detectors beyond the older household names.4. Google Nest Protect And Its Replacement EraNest Protect was one of the most loved smart smoke alarms for years because it looked clean, gave voice alerts, and sent phone notifications. But Google has discontinued Nest Protect, with First Alert now positioned as the partner replacement for Google Home users. That shift matters for anyone searching for the Best Smart Smoke Alarm in 2026. Buyers should check whether a model is still supported, whether it works with their app, and whether replacement units will be easy to find later.Smart safety devices are only helpful if the ecosystem stays supported.5. First Alert Smart Smoke And CO AlarmFor Google Home users, the newer First Alert smart smoke and CO alarm is worth watching. It is meant to fill the space left by Nest Protect and can connect with the Google Home app in supported setups. Wired noted that Google has partnered with First Alert after discontinuing Nest Protect. This can be a good fit for someone who wants phone alerts and a cleaner smart-home experience. It also makes sense for people already using Google devices at home.Read Next: Best Driveway Alarms and Sensors for Reliable Home Security6. Kidde Ring Smart Smoke And CO AlarmFor households using Ring or Alexa, Kidde's Ring-enabled smoke and CO alarms are interesting. Wired reported that Kidde launched a battery-powered smart smoke and CO alarm with Ring in 2026, giving renters and non-hardwired homes a more flexible option. This kind of Best Smart Smoke Alarm setup makes sense when people want alerts on their phones while away from home. Still, smart alerts should be treated as extra help, not the only layer of safety.7. Siterwell Smoke DetectorsSiterwell may not have the same household-name recognition as First Alert or Kidde, but it shows up in tested product lists and offers affordable smoke and CO detector options.For budget-conscious families, Siterwell can be worth comparing. The important thing is to check certifications, sensor type, battery style, and whether the unit fits the room where it will be installed.Cheap is fine. Unknown and uncertified is not fine.8. Hardwired Smoke DetectorsHardwired alarms are common in newer homes and can be interconnected. That means when one alarm sounds, the others can sound too. This is useful because a fire in the basement or garage area may be heard faster upstairs.The USFA says smoke alarms should be tested monthly and replaced every 10 years, whether they are battery-powered or hardwired. Hardwired units also need backup batteries checked according to instructions. For homeowners replacing old hardwired alarms, matching the wiring setup and connector type can make installation easier.9. Combination Smoke And CO DetectorsA combination alarm can detect smoke and carbon monoxide in one unit. That sounds convenient, and it often is. Bedrooms, hallways, and living areas may benefit from combo units, especially in homes with fuel-burning appliances.A carbon monoxide detector is not only for homes with obvious fireplaces. Gas furnaces, water heaters, attached garages, and generators used incorrectly can all create risk. CO is dangerous because people cannot see or smell it.What To Check Before Buying?Before choosing from the top brands of smoke detectors, buyers should look at the home first. How many bedrooms? How many levels? Is there a basement? Are there gas appliances? Does the home already have hardwired alarms?Simple Buying ChecklistA good detector should offer:Proper certificationThe right sensor typeLoud alarm soundBattery backupEasy test buttonClear replacement dateCO detection if neededInterconnection where possibleSmart alerts if usefulThe best alarm is not always the fanciest one. It is the one that fits the home and stays working.On a Similar Note: How to Find the Best Video Doorbell Cameras: Step-by-Step GuideFinal ThoughtsSmoke detectors are easy to ignore until they are needed. That is why buying the right ones, placing them properly, and testing them regularly matters so much.The safest home may use a mix: hardwired alarms where available, smart alarms in key spots, combo smoke and CO units where needed, and enough coverage for every sleeping area. Whether buyers choose First Alert, Kidde, X-Sense, Siterwell, or another trusted brand, the priority should be working protection, not just smart features.For anyone choosing the Best Smoke Detectors, the smartest move is simple. Buy reliable alarms, install enough of them, test them monthly, replace old units, and never treat a dead battery chirp like background music.FAQ1. How Often Should Smoke Detectors Be Replaced?Most smoke detectors should be replaced every 10 years, even if they still beep during a test. Sensors age, dust builds up, and older units may not respond as well as they once did. The easiest way to check is to look for the manufacture date on the back of the alarm. If it is near or past 10 years, replacement is the safer choice.2. Should A Home Have Separate Smoke And Carbon Monoxide Alarms?It can, but combo units are also common and useful. A separate setup may make sense if the best smoke alarm location and best CO alarm location are not the same. Carbon monoxide alarms are especially important near sleeping areas and in homes with fuel-burning appliances or attached garages. The key is coverage, not whether the device is separate or combined.3. Are Smart Smoke Detectors Worth The Extra Money?They can be worth it for people who travel often, manage rentals, or want phone alerts when away from home. Smart alarms can also give voice warnings or app notifications. Still, they are not automatically safer if placement is poor or batteries are ignored. A basic, properly placed alarm is better than a smart one installed in the wrong spot.